Home Screen: What to Know?

- Recordings
- These will be your dmp files from VPX
- ALL your scenes will be cut from here
- ALL your keyframing will come from here
- Scenes
- Scenes you cut from recordings
- All Coloring will be done here
- Dynamic or Non-Dynamic Content
- Keyframes
- Will be created from the recordings
- Will trigger your new scenes in the game
- Palette Switch or Color Scene
- Requires patience and creativity!
Types of Scenes
There are two types of scenes that we will come across while coloring our DMD’s.
It’s Important that you know the difference!
- Non-Dynamic Content Scenes
- Scenes that contain NO changing content, often times these are just animations or pictures
- These scenes can be colored pretty much at will and offer more freedom when coloring
- These scenes are generally easier to get right and beginners should start with these.
- Dynamic Content Scenes
- Scenes that contain content that is always changing ie. Scores, Timers, etc.
- “ColorMask” mode must be used in these scenes to avoid losing the dynamic content
- These scenes generally require more patience and creativity to get right.
- Less freedom to color these scenes than Non-Dynamic Content Scenes
Step 1: Loading Animations or Recordings
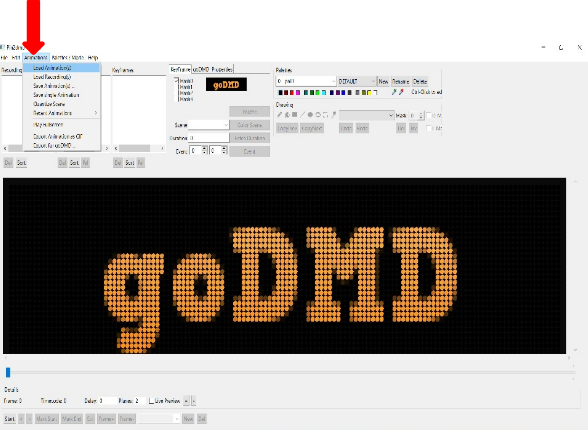
- Click on the Animations tab on the upper toolbar.
- Select Load Animations and select the dump files included which should be saved as GZ file types.
The dump files are the recordings made from Visual PinMame or Real Pinball while playing the table. These recordings will give you the animations displayed on the DMD. You’ll need to be thorough in performing all the shots on the table if you want to get all images to color. You can load multiple animations into a project but remember the more you load the larger your project becomes!
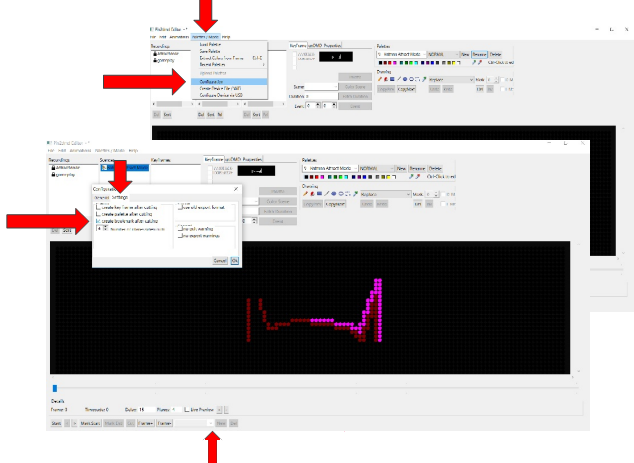
Tip for Success
- Select the Palettes/Mode tab on top toolbar and then select “Configuration” in the drop down menu.
- In the window select the “settings” tab and check the box for “create bookmark after cutting”
- This will track all of the scenes you cut for easy reference later in the search box on the bottom toolbar.
Step 2: Cutting a Scene
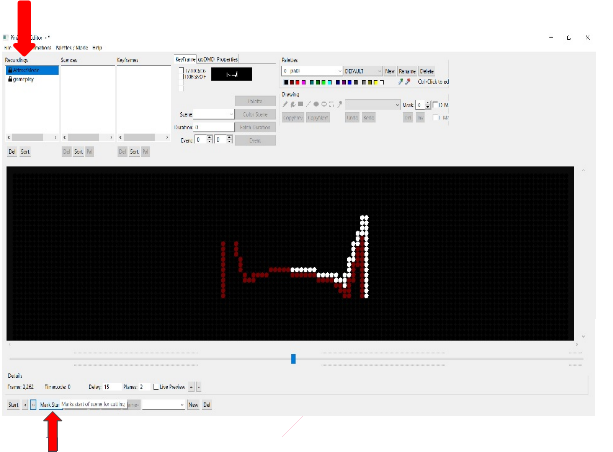
- Click on a recording(AttractMode) and you’ll now be able to scroll through all the animations we captured.
- Find the First Frame of the scene we are coloring and push the “Mark Start” button on bottom toolbar.
You’ll notice that each frame is numbered at the bottom and you can scroll through these recordings in a couple different ways:
- Frame by Frame
- Start button will play automatically
- Scroll Bar
- Find the Last Frame of the scene and push the “Mark End” button on bottom toolbar.
- The “Cut” button is now available to you, push that and now you’ll have a scene in the Scene section up top.
If the “Cut” button is greyed out hit the “Mark End” button again to make sure it registered.
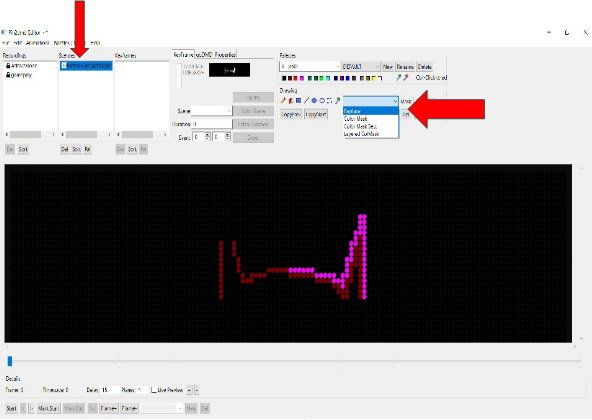
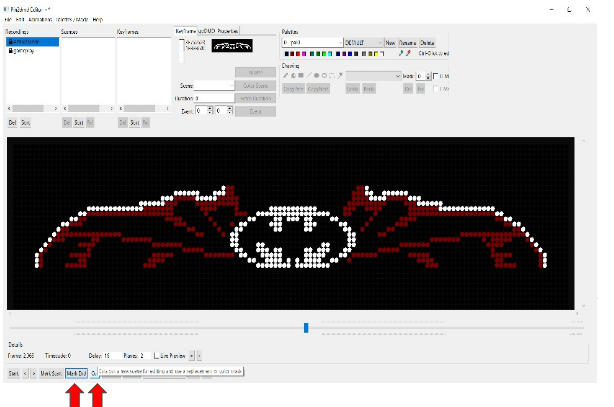
- Click on the Scene and rename: e.g. “Batman Attract Mode”
- We must DEFINE the scene type
This particular scene contains no dynamic content it’s just a simple downward scroll of the caped crusader. So it needs to be set up in “Replace” mode.
This means that however we choose to color this scene we will be replacing the original content with our own new design.
Note: A Non-Dynamic Content scene can be switched between ColorMask and Replace modes with no challenges.
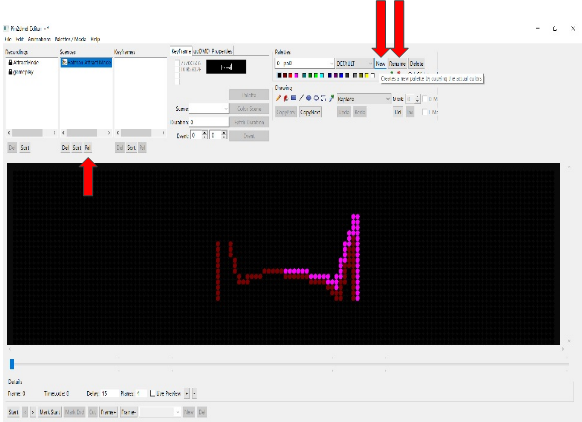
Now that we have a scene cut we can use the existing pre-defined palettes to color or we can create our own custom palette.
- Select the “New” button and rename the palette, you must keep the (# – ) format before your name. (I generally name them the same as my scene for reference)
- Select the “Rename” button, this saves the palette.
- Select the “Pal” button under the Scenes list to apply palette to scene
You are now ready to begin setting the colors for your palette and coloring your scene!
Chapter 2: Coloring Non-Dynamic Content Scenes in Replace mode